HiPi::Interface::MonoOLED
This module provides an interface to common monochrome OLED's using the SSD1306 and SH1106 driver ics.
 |
 |
 |
It uses either HiPi::Device::I2C or HiPi::Device::SPI as a backend.
Methods
- new
- display_reset
- display_update
- block_update
- display_flip
- display_on
- display_off
- invert_display
- normal_display
- set_contrast
- set_start_line
- clear_buffer
- invert_pen
- create_context
- draw_arc
- draw_bit_array
- draw_circle
- draw_context
- draw_ellipse
- draw_line
- draw_pixel
- draw_polygon
- draw_rectangle
- draw_rounded_rectangle
- draw_text
- get_text_extents
Creates a new instance of the module class
use HiPi qw( :oled );
use HiPi::Interface::MonoOLED;
my $oled = HiPi::Interface::MonoOLED->new(
    type => SSD1306_128_X_64_I2C
);
Constants are provided for the controller IC, OLED size and bus for each type that the module supports.
- SSD1306_128_X_64_I2C
- SSD1306_128_X_32_I2C
- SSD1306_128_X_64_SPI
- SSD1306_128_X_32_SPI
- SH1106_128_X_64_I2C
- SH1106_128_X_32_I2C
- SH1106_128_X_64_SPI
- SH1106_128_X_32_SPI
SPI breakouts and potentially an I2C breakout use a reset pin. If your breakout has one, you should specify it in the constructor.
For I2C devices, you may also specify the I2C address ( default is 0x3C )
use HiPi qw( :oled :rpi);
use HiPi::Interface::MonoOLED;
my $oled = HiPi::Interface::MonoOLED->new(
    type      => SSD1306_128_X_64_I2C,
    address   => 0x3C,
    reset_pin => RPI_PIN_40,
);
For breakouts using the SPI bus, you will need to specify a DC pin ( data / command ). You may also specify the devicename ( default /dev/spidev0.0 )
use HiPi qw( :oled :rpi);
use HiPi::Interface::MonoOLED;
my $oled = HiPi::Interface::MonoOLED->new(
    type       => SH1106_128_X_64_SPI,
    devicename => '/dev/spidev0.0',
    dc_pin     => RPI_PIN_38,
    reset_pin  => RPI_PIN_40,
);
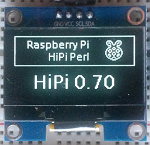
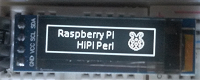
By default, on startup the module resets your OLED and displays a logo. This is useful for initial confirmation that your setup works.
This may not be desired in your projects. You can skip the logo_display by setting the param 'skip_logo' in the constructor. You can skip any reset of the OLED ( and the logo ) by passing the param 'skip_reset' in the constructor.
use HiPi qw( :oled :rpi);
use HiPi::Interface::MonoOLED;

# skip the logo but reset the device

my $oled = HiPi::Interface::MonoOLED->new(
    type      => SSD1306_128_X_64_I2C,
    skip_logo => 1,
);

# skip all reset ( including logo )

$oled = HiPi::Interface::MonoOLED->new(
    type       => SSD1306_128_X_64_I2C,
    skip_reset => 1,
);
If you wish to flip the display top to bottom ( it appears upside down in your project ) you can do so in the constructor.
use HiPi qw( :oled );
use HiPi::Interface::MonoOLED;
my $oled = HiPi::Interface::MonoOLED->new(
    type      => SSD1306_128_X_64_I2C,
    flipped   => 1,
);
Clear the display buffer and reset the display
$oled->display_reset()
All drawing methods store data in a buffer. They are not written to the display until you call display_update
$oled->display_update()
Calling display_update sends the entire contents of the local buffer to the display. If you wish you can update only a portion of the display by calling this method.
- $x1, $y1 - the top left of the block you wish to update.
- $x2, $y2 - the bottom right of the block you wish to update.
Note that although you can specify columns ($x1, $x2) exactly, the rows ($y1, $y2) can only be updated a full page at a time. The displays are split into pages of 8 rows each. For a 64 row display that is 8 pages (numbered 0 to 7). For a 32 row display that is 4 pages (numbered 0 to 3).
The module updates the page range that includes your $y1 and $y2 coordinates.
For example, if you specify $y1 = 10 and $y2 = 20, these coordinates are in
- $y1 = 10 - row 10 is in page 1
- $y2 = 20 - row 20 is in page 2
- $y1 == 10 is effective $y1 == 8 ( start of page 1 )
- $y2 == 20 is effective $y2 == 23 ( end of page 2 )
$oled->block_update( 45, 10, 72, 20);
Reverse the top and bottom of the display. Useful if the display appears upside down when fitted to your project.
Note that the 'flipped' state of the display can also be set in the contructor.# Flip display upside down $oled->display_flip( 1 ); # Flip display back $oled->display_flip( 0 );
Switch the display on. This happens automatically at module start up unless you specify 'skip_reset' in the constructor.
$oled->display_on();
Switch the display off. This stops the OLED displaying. It does not clear the display state.
$oled->display_off();
Set the display to show inverse pixels. That is, pixels that are 'on' will be switched off and pixels that are 'off' will be switched on.
The display can be returned to normal operation using 'normal_display'
$oled->invert_display();
Return display to normal display mode if it is currently in inverted (inverse ) mode
$oled->normal_display();
Set the display contrast level. $contrast is a number between 0 and 255. At startup if 'skip_reset' is not specified the contrast is set at 0x7F.
$oled->set_contrast( 3 );
Set the start line for the display. By default this is row 0. If set to a different line, that line will be mapped to the top of the display. Lines will wrap so that all lines are displayed.
$oled->set_start_line( 5 );
The module writes all drawing operations to a local buffer that you write to the display using display_update. You can clear all pixels set in the buffer using clear_buffer.
$oled->clear_buffer();
            # optionally send to display
            $oled->display_update()
Set invert_pen to set pixels you write using the drawing methods to 'off' rather than on. This is useful to draw items as 'off' over areas you may have previously set 'on'
# draw a filled rectangle
$oled->draw_rectangle(10,20, 60, 40, 1);
$oled->invert_pen(1);
# write some text over the rectangle
$oled->draw_text(12, 25, 'Hello World', 'Sans12');
# restore normal pen
$oled->invert_pen(0);
Instead of writing to the buffer directly, you can use drawing methods on a HiPi::Graphics::DrawingContext which can then be written to the buffer using draw_context.
You can draw the same context on the buffer many times. You can rotate all the pixels in a context as you write it to the buffer.
my $ctx = $oled->create_context();
$ctx->draw_text(0,0,'Hello World'. 'Sans12');
# write it to the buffer at position 10,20 and rotate it 90 degrees.
$oled->draw_context( 10, 20, $ctx->rotated_context( 90, 0, 0) );
# write it to the buffer at position 100,30 and rotate it 180 degrees.
$oled->draw_context( 100, 30, $ctx->rotated_context( 180, 0, 0 ) );
Draw an arc.
- $x,$y is the origin of the arc
- $rw and $rh are the horizontal ( $rw - width ) and vertical ( $rh - height ) radius to use when drawing the arc. If $rw and $rh are equal, you will draw the arc of a circle
- $start and $end denote the start and end of the arc in degrees. See the diagram below
- $join is optional. If specified ( $join == 1 ) lines are drawn from the origin to the end points of the arc
- $fill is optional. If specified ( $fill == 1 ) the arc is filled.
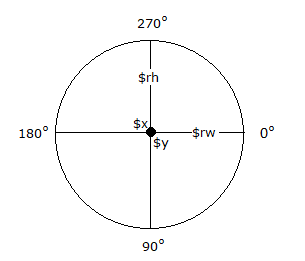
# draw 20 degree arc of a circle at x = 63, y = 15, 10 pixel radius
$oled->draw_arc(63, 15, 10, 10, 350, 10);

# same arc, but draw lines from origin to edges
$oled->draw_arc(63, 15, 10, 10, 350, 10, 1);

# same arc, but filled
$oled->draw_arc(63, 15, 10, 10, 350, 10, 0, 1);
Draw an array of 1 / 0 values as a bitmap.
- $x, $y is the origin to draw at
- $bitarray is a reference to an array defining the points
- $fill is optional but if specified, bits that are 0 in the array will be explicitly written to the buffer. If fill is not specified, only bits that are 1 are explicitly written. Using $fill is usefull if you want to overwrite an area of the buffer that has previously been written to.
# Draw a 'raspberry' starting at x = 10, y = 15
my $bitarray =  [
    [ 0, 0, 0, 0, 0, 0, 0, 0, 0, 0,   0, 0, 0, 0, 0, 0, 0, 0, 0, 0 ],
    [ 0, 0, 0, 1, 1, 1, 1, 0, 0, 0,   0, 0, 0, 1, 1, 1, 1, 0, 0, 0 ],
    [ 0, 0, 1, 0, 0, 0, 0, 1, 0, 0,   0, 0, 1, 0, 0, 0, 0, 1, 0, 0 ],
    [ 0, 0, 1, 0, 1, 1, 0, 0, 1, 0,   0, 1, 0, 0, 1, 1, 0, 1, 0, 0 ],
    [ 0, 0, 1, 0, 0, 0, 1, 0, 1, 0,   0, 1, 0, 1, 0, 0, 0, 1, 0, 0 ],

    [ 0, 0, 0, 1, 0, 0, 0, 0, 0, 1,   1, 0, 0, 0, 0, 0, 1, 0, 0, 0 ],
    [ 0, 0, 0, 0, 1, 1, 1, 0, 0, 0,   0, 0, 0, 1, 1, 1, 0, 0, 0, 0 ],
    [ 0, 0, 0, 0, 0, 0, 1, 0, 0, 0,   0, 0, 0, 1, 0, 0, 0, 0, 0, 0 ],
    [ 0, 0, 0, 0, 1, 1, 0, 0, 0, 1,   1, 0, 0, 0, 1, 1, 0, 0, 0, 0 ],
    [ 0, 0, 0, 1, 0, 0, 0, 0, 1, 0,   0, 1, 0, 0, 0, 0, 1, 0, 0, 0 ],

    [ 0, 0, 1, 0, 0, 1, 1, 0, 0, 1,   1, 0, 0, 1, 1, 0, 0, 1, 0, 0 ],
    [ 0, 0, 1, 0, 1, 0, 0, 1, 0, 0,   0, 0, 1, 0, 0, 1, 0, 1, 0, 0 ],
    [ 0, 1, 0, 0, 1, 0, 0, 1, 0, 0,   0, 0, 1, 0, 0, 1, 0, 0, 1, 0 ],
    [ 0, 1, 0, 0, 0, 1, 1, 0, 0, 1,   1, 0, 0, 1, 1, 0, 0, 0, 1, 0 ],
    [ 0, 1, 0, 0, 0, 0, 0, 0, 1, 0,   0, 1, 0, 0, 0, 0, 0, 0, 1, 0 ],

    [ 0, 1, 0, 0, 1, 1, 0, 0, 1, 0,   0, 1, 0, 0, 1, 1, 0, 0, 1, 0 ],
    [ 0, 0, 1, 0, 1, 0, 1, 0, 0, 1,   1, 0, 0, 1, 0, 1, 0, 1, 0, 0 ],
    [ 0, 0, 1, 0, 0, 1, 1, 0, 0, 0,   0, 0, 0, 1, 1, 0, 0, 1, 0, 0 ],
    [ 0, 0, 0, 1, 0, 0, 0, 0, 0, 1,   1, 0, 0, 0, 0, 0, 1, 0, 0, 0 ],
    [ 0, 0, 0, 0, 1, 1, 0, 0, 1, 0,   0, 1, 0, 0, 1, 1, 0, 0, 0, 0 ],

    [ 0, 0, 0, 0, 0, 0, 1, 1, 0, 0,   0, 0, 1, 1, 0, 0, 0, 0, 0, 0 ],
    [ 0, 0, 0, 0, 0, 0, 0, 0, 1, 1,   1, 1, 0, 0, 0, 0, 0, 0, 0, 0 ],
    [ 0, 0, 0, 0, 0, 0, 0, 0, 0, 0,   0, 0, 0, 0, 0, 0, 0, 0, 0, 0 ],
];

$oled->draw_bit_array( 10, 15, $bitarray );
Draw a circle at origin $x $y using radius $r. If $fill is specified, fill the circle
$oled->draw_circle( 15, 15, 10 );
Write a drawing context to the buffer.
Instead of writing to the buffer directly, you can use drawing methods on a HiPi::Graphics::DrawingContext which can then be written to the buffer using draw_context.
You can draw the same context on the buffer many times. You can rotate all the pixels in a context as you write it to the buffer.
my $ctx = $oled->create_context();
$ctx->draw_text(0,0,'Hello World'. 'Sans12');

# write it to the buffer at position 10,20 and rotate it 90 degrees.
$oled->draw_context( 10, 20, $ctx->rotated_context( 90, 0, 0) );

# write it to the buffer at position 100,30 and rotate it 180 degrees.
$oled->draw_context( 100, 30, $ctx->rotated_context( 180, 0, 0) );
Draw an ellipse.
- $x,$y is the origin of the ellipse
- $rw and $rh are the horizontal ( $rw - width ) and vertical ( $rh - height ) radius to use when drawing the $ellipse. If $rw and $rh are equal, you will draw a circle
- $fill is optional. If specified ( $fill == 1 ) the ellipse is filled.
$oled->draw_ellipse(20, 15, 10, 7);
Draw a line between $x1,$y1 and $x2,$y2. $endpoint denotes whether the pixel at $x2,$y2 should be written. The default value for $endpoint is 1 ( true ).
$oled->draw_line( 0, 0, 127, 31);
Set a single pixel to 1 (on) or 0 (off).
$x, $y define the pixel to write. $on can be 1 or 0 ( default 1 )
# set pixel at 0,0 to 'on'
$oled->draw_pixel( 0, 0 );

# set same pixel to 'off'
$oled->draw_pixel( 0, 0, 0 );
Draw a polygon
- $vertices is a reference to an array of points representing the vertices of the polygon. If the final point is not equal to the first point, the polygon will be closed anyway.
- $fill may be optionally set to fill the polygon.
$oled->draw_polygon( [ [41,32],[63,60],[84,32],[78,53],[46,53] ] );
# draw it filled
$oled->draw_polygon( [ [41,32],[63,60],[84,32],[78,53],[46,53] ], 1 );
Draw a rectangle
- $x1, $y1 is the top left of the rectangle
- $x2, $y2 is the bottom right of the rectangle
- $fill can be optionally be specified ( 1 ) to fill the rectangle
$oled->draw_rectangle( 10, 15, 30, 20 );
Draw a rectangle with rounded corners
- $x1, $y1 is the top left of the rectangle
- $x2, $y2 is the bottom right of the rectangle
- $r is the radius to use for the arc that will form the rounded corners. The default value is 4.
- $fill can be optionally be specified ( 1 ) to fill the rectangle
$oled->draw_rounded_rectangle( 10, 15, 30, 20, 5 );
Draw text to the buffer
- $x, $y is the origin for drawing the text. The origin is in the top left corner of the text.
- $text is the text string to be written
- $font can either be a string naming one of the builtin fonts, or a reference to a font object. The default font is Mono10
The method returns the width and height of the text as written to the buffer
my $y = 0;
my( $w, $h ) = $oled->draw_text(0, $y, 'Hello World', 'Sans12');
$y += $h;
( $w, $h ) = $oled->draw_text(0, $y, 'Raspberry Pi', 'Sans12');
$y += $h;
( $w, $h ) = $oled->draw_text(0, $y, 'HiPi Perl', 'Sans12');
Several builtin fonts are provided.
The standard fonts include the printable ascii characters and the 'degree' character ( U+00B0 )
- Sans10, Sans12, Sans14, Sans15, Sans19, Sans20, Sans26, Sans33
- Mono10, Mono12, Mono14, Mono15, Mono19, Mono20, Mono26, Mono33
- Serif10, Serif12, Serif14, Serif15, Serif19, Serif20, Serif26, Serif33
There are also extended fonts that include all the Latin-1 Supplement characters
- SansExtended11, SansExtended13, SansExtended15, SansExtended17, SansExtended21, SansExtended23, SansExtended30, SansExtended38
- MonoExtended11, MonoExtended13, MonoExtended15, MonoExtended17, MonoExtended21, MonoExtended23, MonoExtended30, MonoExtended38
- SerifExtended11, SerifExtended13, SerifExtended15, SerifExtended17, SerifExtended21, SerifExtended23, SerifExtended30, SerifExtended38
EPD fonts created at a higher DPI are also included intended for use with E-Paper displays but you may use any of the bitmap fonts with both OLED and EPaper displays. THE EPD fonts include all the Latin-1 Supplement characters.
- SansEPD15, SansEPD19, SansEPD23, SansEPD28, SansEPD31, SansEPD38, SansEPD50, SansEPD76, SansEPD102
- MonoEPD15, MonoEPD19, MonoEPD23, MonoEPD28, MonoEPD31, MonoEPD38, MonoEPD50, MonoEPD76, MonoEPD102
- SerifEPD15, SerifEPD19, SerifEPD23, SerifEPD28, SerifEPD31, SerifEPD38, SerifEPD50, SerifEPD76, SansEPD102
The fonts are derived from the Bitstream Vera family.
It is expected that many users will need characters outside the builtin range. HiPi includes tools to create your own bitmapped fonts in the same way the builtins were created.
Get the width and height of the text, without writing to the buffer. This can be helpful to work out where to position the text.
# Write the text to the centre of the OLED
my( $w, $h ) = $oled->get_text_extents( 'Raspberry Pi', 'Sans12' );
# centre of text
my $x = int(0.5 + ($oled->cols - $w) / 2);
my $y = int(0.5 + ($oled->rows - $h) / 2);
$oled->draw_text( $x, $y, 'Raspberry Pi', 'Sans12' );
Examples
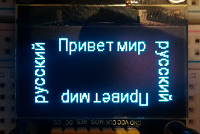
Rotated Text

use HiPi qw( :oled :rpi );
use HiPi::Interface::MonoOLED;

my $oled = HiPi::Interface::MonoOLED->new(
    type      => SH1106_128_X_64_SPI,
    reset_pin => RPI_PIN_40,
    dc_pin    => RPI_PIN_38,
    flipped   => 1,
);

$oled->clear_buffer;

my $ctx = $oled->create_context;

my( $w, $h) = $ctx->draw_text(0,0,'Raspberry Pi', 'Sans14');

# Draw all raspberrys & perls in centre

# centre of text
my $cx = int( 0.5 + $w / 2);
my $cy = int( 0.5 + $h / 2);

# draw top line centered
{
    my $x = int(0.5 + ($oled->cols - $w) / 2);
    my $y = 0;
    $oled->draw_context( $x, $y, $ctx->rotated_context( 0, 0, 0) );
}

# draw bottom line rotated through 180 about its centre
{
    my $x = int(0.5 + ($oled->cols - $w) / 2);
    my $y = $oled->rows - $h -1;
    $oled->draw_context( $x, $y, $ctx->rotated_context( 180, $cx, $cy) );
}

$ctx->clear_context;

( $w, $h) = $ctx->draw_text(0,0,'Perl', 'Sans14');
$cx = int( 0.5 + $w / 2);
$cy = int( 0.5 + $h / 2);

# Perl right
{
    my $x = $oled->cols -1;
    my $y = int( 0.5 + ($oled->rows - $w) / 2);
    $oled->draw_context( $x, $y, $ctx->rotated_context( 90, 0, 0 ) );
}

# Perl left
{
    my $x = 0;
    my $y = int( 0.5 + ($w + $oled->rows) / 2);
    $oled->draw_context( $x, $y, $ctx->rotated_context( -90, 0, 0 ) );
}