hipi_energenie
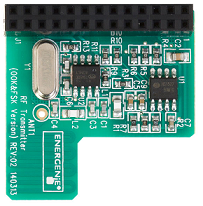
The hipi-energenie command allows you to control and monitor the Energenie range of sockets, switches and sensors directly from the command line using either the Energenie ENER314_RT 2 way transceiver board or the Energenie ENER314 1 way transmitter board.
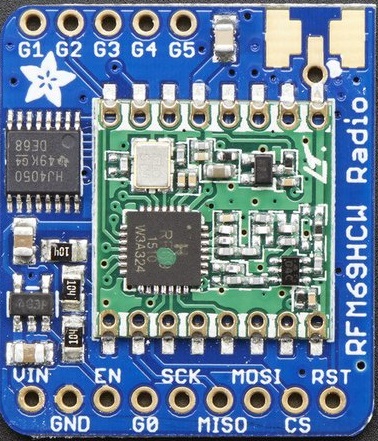
The command can also be used with any RF69 module.
Standard RF69 modules ( RF69W and RF69CW ) can be used by specifying board type ENER314_RT in configuration.
High power RF69 modules ( RF69HW and RF69HCW ) can be used by specifying board type RF69HW in in configuration.
 |
The ENER314 1 way transmitter board can only switch on and off up to 4 control only sockets or switches. |
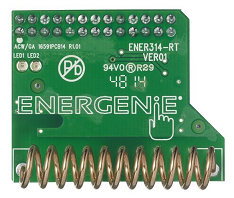 |
The ENER314_RT 2 way transceiver board can switch any number of control only sockets or switches and can control and monitor smart adapters and sensors. |
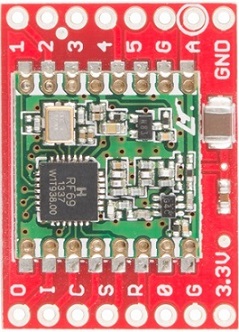 |
Any RF69 module can switch any number of control only sockets or switches and can control and monitor smart adapters and sensors. |
- Command Line Help
- Help for individual commands
- Configuring the Command
- Setting the board type
- Changing the SPI device
- Controlling Switches and Sockets
- Creating a Group
- Pairing a Socket
- Switching a Socket
- Monitors and Smart Adapters
- Pairing with a Monitor, Sensor or Adapter
- Querying a Monitor
- Switching an Adapter
- Scripting hipi-energenie commands
- Returning command output as JSON
- Using the HiPi::Energenie::Command module
Command line Help
hipi-energenie provides help for all commands. At the top level, the command:
hipi-energenie help
provides initial help on command usage
pi@raspberry:~ $ hipi-energenie help

  usage : hipi-energenie <command> [options]

  command :
    help        Print this message
    version     Print the version
    config      Configure the board type ( ENER314_RT or ENER314 )
    group       Manage groups for use with sockets
    pair        Pair a socket or switch
    alias       Rename or name a socket or switch
    switch      Switch a socket or switch on or off
    join        Configure a monitor or adaptor
    adapter     Switch an adapter device on or off
    monitor     Query a monitoring device for values

  For help on each command use:
    hipi-energenie <command> -h
Help for individual commands
Each command has its own help. To view this pass the command option --help or -h
For example, for help on the join command
hipi-energenie join --help
Help is output to the console.
pi@raspberry:~ $ hipi-energenie join --help

  usage : hipi-energenie join < options >

  description: Join a Mi|Home monitor or adapter. Run this command first and
               then switch your adapter or monitor to join mode.

  options :

    --help        -h  Display this message

    --list        -l  List the adapters and monitors already joined

    --name        -n  < name > A name for the adapter or monitor. This
                      is required.

    --timeout     -t < timeout > Timeout in seconds to wait for a join request.
                      The default is 60.

    --rename      -r  < name > You can rename an adapter. If --rename is specified
                      then --rename contains the existing name and --name contains the
                      new name.

    --delete      -d  < name > Remove the named monitor or adapter from configuration

    --json            The command results will be output as a JSON
                      string. This can be used when you want to parse
                      the command output from external code.

    --pretty          The command results will be output as formatted JSON
                      with line breaks and indentation.
Configuring The Command
Before using hipi-energenie there is some basic configuration you must create. This is achieved using the command
hipi-energenie config
Calling the command with no options lists the current configuration. The first time hipi-energenie is run it will create a default configuration.
pi@raspberry:~ $ hipi-energenie config

CONFIGURATION
-----------------------------------------
  Config Version   :  0.61
  Energenie Board  :  ENER314_RT
  Receiver         :  YES
  Uses SPI         :  YES
  SPI Device       :  /dev/spidev0.1
  Config Saved     :  2017-09-18 02:55:46
You can change the type of board you have connected to the Raspberry Pi( ENER314_RT, RF69HW or ENER314 )
Standard RF69 modules ( RF69W and RF69CW ) can be used by specifying board type ENER314_RT.
High power RF69 modules ( RF69HW and RF69HCW ) can be used by specifying board type RF69HW.
If you are using the ENER314_RT or RF69HW you can change the /dev device it is connected to ( /dev/spidev0.1, /dev/spidev0.0, etc. )
To get help on using the config command, use option --help or -h
hipi-energenie config -h
pi@raspberry:~ $ hipi-energenie config -h

  usage : hipi-energenie config <options>

  options :

    --help        -h  Display this message

    --list        -l  List the current config

    --board       -b  < ENER314 | ENER314_RT | RF69HW > Set the board type that
                      you have connected to the Raspberry Pi.
                      Default is 'ENER314_RT'

    --device      -d  < devicename > Set the SPI device used by the
                      ENER314_RT or RF69HW board. Default is '/dev/spidev0.1'

    --reset       -r  < gpio > Specify the GPIO pin connected to
                      the reset pin on the ENER314_RT or RF69HW  board.
                      Default is 25 ( RPI_PIN_22 )

    --json            The command results will be output as a JSON
                      string. This can be used when you want to parse
                      the command output from external code.

    --pretty          The command results will be output as formatted JSON
                      with line breaks and indentation.
After each config command the resulting configuration is output to the console.
Note that your configuration and all settings for switches and adapters are saved in a user specific configuration file.
For example, for user pi it is stored at
/home/pi/.hipi-perl/scripts/energenie/user.conf
For user root the configuration is stored at
/etc/hipi-perl/scripts/energenie/global.conf
This means that if you wish to run scripts that call hipi-energenie commands from the global cron, you need to either create your configuration using sudo hipi-energenie, copy your user.conf to the global.conf, or probably best, su to user pi in your cron.
You should backup your config file after making changes as it contains all the ids for your configured devices.
Setting the board type
hipi-energenie can currently use three types of RF boards or modules
The ENER314_RT board is a 2-way transceiver that allows you to manage sensors and monitors in addition to switches and sockets.
hipi-energenie can also use any RF69HW ( high power ) module as a 2-way transceiver that allows you to manage sensors and monitors in addition to switches and sockets.
The ENER314 board can control just 4 individual sockets or one 4 gang extension.
The board can be set using the --board option to the config command
hipi-energenie config -b ENER314_RT
hipi-energenie config -b ENER314
hipi-energenie config -b RF69HW
You may be able to use any RF69W module by selecting a board type of ENER314_RT. (Note: the RF69HW board setting is for RF69H... modules with optional high power settings.)
Changing the SPI device
If you are using the ENER314_RT or RF69HW board setting you can set which SPI device it is connected to. By default if an ENER314_RT is connected directly to the Raspberry Pi header, it will use device /dev/spidev0.1 but you may have connected to a difference SPI using your own setup rather than fitting the board directly to the GPIO header or you may be using a RF69HW board.
To change the SPI device, use the --device option to the config command.
hipi-energenie config -d /dev/spidev0.1
hipi-energenie config -d /dev/spidev0.0
Controlling Switches and Sockets
 |
 |
 |
Basic switches and sockets from Energenie can be controlled in groups of 4. This is because the protocol used to switch on and off uses a unique group id plus the socket number - 1 to 4.
If you are using the 1 way transmitter board ENER314 then the maximum number of sockets you can control individually is 4. This is because the group id is hard coded into the board in the same way that one of the Energenie hand held remotes works. It is suggested that you can control more than 4 switches which is technically true but only if you pair more than one switch with a switch number and switch all of those devices on or off at the same time.
If you are using a 2 way transceiver ( ENER314_RT or RF69HW ) you can set the group id to use when sending a command in software so the number of switches you can control is not limited by having a single fixed group id.
Creating a Group
To start controlling sockets we must first create a group. We do this using the group command.
hipi-energenie group --help
pi@raspberry:~ $ hipi-energenie group -h

  usage : hipi-energenie group < options >

  description: Set up groups for use with ENER314_RT or RF69HW board to control
               multiple sets of simple switches or sockets.

  options :

    --help        -h  Display this message

    --list        -l  List the currently configured groups

    --create      -c  < name > Create a new group. The system will create a new
                      unused group id and associate the supplied name with it.
                      e.g. hipi-energenie group -c newname
                      Provide option --groupid to name an existing group.

    --delete      -d  < name > Delete an existing group.
                      e.g. hipi-energenie group -d 'my group 1'

    --rename      -r  < name > Rename an existing group. Must be accompanied
                      by option for --newname.
                      e.g. hipi-energenie group -r oldname -n newname

    --newname     -n  < name > The new name for a group. (used with --rename)

    --groupid         < groupid > The group id identifier that is used
                      to control a group of four switches or sockets,
                      or one 4 way gang extension. This is a number
                      between 0x01 and 0xFFFFF. The parameter can be
                      passed in decimal, hexadecimal or binary
                      notation. It is parsed by the Perl 'oct'
                      function.

    --json            The command results will be output as a JSON
                      string. This can be used when you want to parse
                      the command output from external code.

    --pretty          The command results will be output as formatted JSON
                      with line breaks and indentation.
We can create a group called 'mysockets' using the command
hipi-energenie group -c mysockets
After this command all the groups we have created are listed
pi@raspberry:~ $ hipi-energenie group -c mysockets

GROUPS
-----------------------------------------
  mysockets                      0x08EEB4
We can use the group command to create more groups, rename groups, delete groups and list the groups we have created.
Pairing a Socket
To control a switch or socket it must first be paired with a group id and switch number.
This is achieved by putting the socket into paring mode and sending a command from your controller. Generally the device can be put into pairing mode my keeping its button depressed for a few seconds until the light on the device begins to flash.
We can pair a socket using the pair command.
pi@raspberry:~ $ hipi-energenie pair -h

  usage : hipi-energenie pair < options >

  description: pair with a simple socket or switch such as an ENER002 switch
               socket; an ENER010 4 way extension; a Mi|Home MIHO002 adapter.
               Set the adapter to pairing mode and run this command.

  options :

    --help        -h  Display this message

    --list        -l  list paired switches

    --groupname   -g  < groupname > A groupname you have configured using the
                      group command. If you are using the transmit
                      only ENER314 board, this option is ignored.

    --switch      -s  < 1 | 2 | 3 | 4 > The number of the switch or socket
                      you want to pair. Each groupname can control a
                      maximum of 4 switches. If you are pairing an
                      ENER010 4 gang extension, use '1'

    --name        -n  < switchname > A name for the paired switch
                      that you may use in the future to command the switch
                      rather than specifying both group and switch
                      number.

    --json            The command results will be output as a JSON
                      string. This can be used when you want to parse
                      the command output from external code.

    --pretty          The command results will be output as formatted JSON
                      with line breaks and indentation.

    ( to rename a switch / group pair use the 'alias' command )
To pair a socket as socket 1 of group 'mysockets' and give it a name 'Wall Plug":
Put the socket into pairing mode and issue the following command:
hipi-energenie pair -g mysockets -s 1 -n "Wall Plug"
Control only sockets and switches do not transmit any information so the only indication that pairing has been successful comes from the device itself - normally by stopping flashing its light.
When the command has completed a list of your currently paired switches is displayed
pi@raspberry: $ hipi-energenie pair -g mysockets -s 1 -n "Wall Plug"

SWITCHES & SOCKETS
------------------------------------------
  NAME               GROUP          SWITCH
  Wall Plug          mysockets           1
You can now switch the socket on and off using the switch command.
Switching a Socket
You can switch a previously paired socket or switch on or off using the switch command
pi@raspberry:~ $ hipi-energenie switch -h

  usage : hipi-energenie switch < options >

  description: Turn a paired socket or switch on or off

  options :
    --help        -h  Display this message

    --list        -l  List the currently configured switches

    --name        -n  < switchname > An alias for the groupname / switch pair

    --groupname   -g  < groupname > If you don't provide a name you can specify
                      groupname and switch number instead. This is the
                      groupname you paired the switch with.
                      If you are using the transmit only ENER314 board,
                      this option is ignored.

    --switch      -s  < 0 | 1 | 2 | 3 | 4 > If you don't provide a name you can
                      specify groupname and switch number instead. This is the
                      number of the switch or socket you want to switch.
                      Specifying 0 switches all members of the group.

    --on          -1  Switch the socket on

    --off         -0  Switch the socket off

    --all             Switch all sockets in the group. The same as specifying
                      --switch 0

    --json            The command results will be output as a JSON
                      string. This can be used when you want to parse
                      the command output from external code.

    --pretty          The command results will be output as formatted JSON
                      with line breaks and indentation.
To switch a device we previously paired as "Wall Plug"
hipi-energenie switch -n "Wall Plug" --on
pi@raspberry: ~ $ hipi-energenie switch -n "Wall Plug" --on

SWITCH BROADCAST STATUS - ON
-------------------------------
  GROUP                  SWITCH
  mysockets                 1
hipi-energenie switch -n "Wall Plug" --off
pi@raspberry: ~ $ hipi-energenie switch -n "Wall Plug" --off

SWITCH BROADCAST STATUS - OFF
-------------------------------
  GROUP                  SWITCH
  mysockets                 1
Monitors and Smart Adapters
 |
 |
 |
 |
 |
Montitors and smart adapters such as the MIHO004 Mi|Home Smart Monitor plug and the MIHO005 Mi|Home Smart Adapter Plus can both broadcast and receive information
Pairing with a Monitor, Sensor or Adapter
To control a smart product you must 'join' with the product first using the join command.
hipi-energenie join --help
Help is output to the console.
pi@raspberry:~ $ hipi-energenie join --help

  usage : hipi-energenie join < options >

  description: Join a Mi|Home monitor or adapter. Run this command first and
               then switch your adapter or monitor to join mode.

  options :

    --help        -h  Display this message

    --list        -l  List the adapters and monitors already joined

    --name        -n  < name > A name for the adapter or monitor. This
                      is required.

    --timeout     -t < timeout > Timeout in seconds to wait for a join request.
                      The default is 60.

    --rename      -r  < name > You can rename an adapter. If --rename is specified
                      then --rename contains the existing name and --name contains the
                      new name.

    --delete      -d  < name > Remove the named monitor or adapter from configuration

    --json            The command results will be output as a JSON
                      string. This can be used when you want to parse
                      the command output from external code.

    --pretty          The command results will be output as formatted JSON
                      with line breaks and indentation.
To join with a device and call it "New Adapter", run the command:
pi@raspberry:~ $ hipi-energenie join -n "New Adapter"
The command will wait for a join message from the device. To send this, switch the device off and depress its button until the light begins to flash. You should see the following output.
pi@raspberry:~ $ hipi-energenie join -n "New Adapter"

Listening for join messages from adapters and monitors. Set your device mode to join ....


MONITORS AND ADAPTERS
---------------------------------------------------------------------
  NAME                 PRODUCT                      SENSORID   SWITCH
  New Adapter          Mi|Home Adapter Plus         0x002BA0      YES
Querying a Monitor
You can now control the adapter by name. To query it for information:
pi@raspberry:~ $ hipi-energenie monitor -n "New Adapter"

MONITOR STATUS REPORT FOR "New Adapter"
---------------------------------------------
  Sensor Type           Mi|Home Adapter Plus
  Sensor Key            0004-0002-002FC8
  Timestamp             2017-09-21 12:43:45
  -------------------------------------------
  Real Power            0 W
  Reactive Power        0 VAR
  Voltage               248 V
  Frequency             49.94921875 Hz
  Switch State          OFF
By default a query waits for 60 seconds for information from an adapter or monitor before timing out. You can set your own timeout using the --timeout | t option
pi@raspberry:~ $ hipi-energenie monitor -n "New Adapter" -t 30
Switching an Adapter
To switch the adapter on :
pi@raspberry:~ $ perl hipi-energenie adapter -n "New Adapter" --on

ADAPTER STATUS REPORT FOR "New Adapter"
---------------------------------------------
  Sensor Type           Mi|Home Adapter Plus
  Sensor Key            0004-0002-002FC8
  Timestamp             2017-09-21 12:46:17
  -------------------------------------------
  Switch State          ON
To switch the adapter off :
pi@raspberry:~ $ perl hipi-energenie adapter -n "New Adapter" --off

ADAPTER STATUS REPORT FOR "New Adapter"
---------------------------------------------
  Sensor Type           Mi|Home Adapter Plus
  Sensor Key            0004-0002-002FC8
  Timestamp             2017-09-21 12:48:04
  -------------------------------------------
  Switch State          OFF
By default a adapter switch command waits for 60 seconds for confirmation of the adapter state before timing out. You can set your own timeout using the --timeout | t option
pi@raspberry:~ $ perl hipi-energenie adapter -n "New Adapter" -t 20 --on
Scripting hipi-energenie commands
The hipi-energenie command can also easily be called from other scripts or your own Perl code and the return results parsed.
Returning command output as JSON
Adding the option --json to any command will return the command result as a JSON string.
During development of your calling script, you can use the option --pretty instead to return an indented JSON string with line breaks.
pi@raspberry:~ $ hipi-energenie monitor -n "New Adapter" --pretty
{
   "command" : "monitor",
   "data" : {
      "configured_name" : "New Adapter",
      "manufacturer_id" : 4,
      "manufacturer_name" : "Energenie",
      "product_id" : 2,
      "product_name" : "Mi|Home Adapter Plus",
      "records" : [
         {
            "command" : 0,
            "id" : 112,
            "name" : "Real Power",
            "units" : "W",
            "value" : 0,
            "value_type" : 128
         },
         {
            "command" : 0,
            "id" : 113,
            "name" : "Reactive Power",
            "units" : "VAR",
            "value" : 0,
            "value_type" : 128
         },
         {
            "command" : 0,
            "id" : 118,
            "name" : "Voltage",
            "units" : "V",
            "value" : 248,
            "value_type" : 0
         },
         {
            "command" : 0,
            "id" : 102,
            "name" : "Frequency",
            "units" : "Hz",
            "value" : 49.94921875,
            "value_type" : 32
         },
         {
            "command" : 0,
            "id" : 115,
            "name" : "Switch State",
            "units" : "",
            "value" : "0",
            "value_type" : 0
         }
      ],
      "sensor_id" : 12232,
      "sensor_key" : "0004-0002-002FC8",
      "switch_state" : "0",
      "timestamp" : "2017-09-21 13:24:10"
   },
   "error" : "",
   "errorcode" : "ERROR_SUCCESS",
   "option" : "query",
   "success" : 1
}
You check the return value of 'success'. If it is true, the returned information will be in the "data" member.
If there was an error, "success" will be false, a string constant will be in "errorcode" and an error decription in "error".
pi@raspberry:~ $ hipi-energenie monitor -n "Bad Name" --pretty
{
   "command" : "monitor",
   "data" : {},
   "error" : "Could not find a configured monitor named Bad Name",
   "errorcode" : "ERROR_MONITOR_NAME_NOT_FOUND",
   "option" : "",
   "success" : 0
}
Using the HiPi::Energenie::Command module
The hipi-energenie command uses the module HiPi::Energenie::Command internally. You can call the same method directly in your own code.
Pass the elements of any hipi-energenie command as an array to the method "handle_command_arguments".
# to replicate a command line call to
# hipi-energenie adapter -n "New Adapter" --off

use HiPi::Energenie::Command;
use JSON;

my $handler = HiPi::Energenie::Command->new;

my $json = $handler->handle_command_arguments( 'adapter', '-n', 'New Adapter', '--off', '--json' );
my $ref = decode_json( $json );

if($ref->{success}) {
    .... good
} else {
    .... bad
}